ADVERTISEMENT
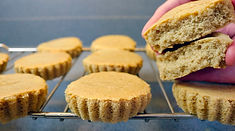
Ube Hopia
Sweet Ube Filling Inside a Soft and Flakey Crust
Ingredients
Ube Filling:
12 oz (1 1/2 cups) ube halaya [340 g]
1/2 tsp ube extract [5 mL]
Dough 1:
3 tbsp granulated sugar [37.5 g]
1/2 cup water (cold) [120 mL]
2 cups all-purpose flour [240 g]
1/4 cup shortening [48 g]
Dough 2:
1 1/4 cup all-purpose flour [150 g]
1/3 cup granulated sugar [66.7 g]
1/2 tsp salt [2.8 g]
1/2 cup (1 stick) unsalted butter (very cold) [113.5 g]
1/4 cup shortening [48 g]
3 tbsp water (very cold)
Egg wash:
1 egg [50 g]
ADVERTISEMENT
ADVERTISEMENT
Instructions
1.)
2.)
1.)
2.)
3.)
1.)
2.)
3.)
1.)
2.)
3.)
4.)
5.)
6.)
7.)
1.)
2.)
3.)
4.)
5.)
6.)
7.)
8.)
9.)
10.)
11.)
Ube Filling:
In a mixing bowl, add in 1 1/2 cups (about 12 oz or one 12-oz jar) of ube halaya and 1/2 tsp of ube extract. Mix these together till very well combined.
On a parchment paper-lined sheet pan, divide the ube into 16 equally-sized portions. They should make an approximate 1 heaping tbsp of ube halaya each. Then let these rest in the fridge till ready to use.
Dough 1:
In a small mixing bowl, dissolve 3 tbsp of granulated sugar in 1/2 cup of cold water.
In a large mixing bowl, add in 2 cups of all-purpose flour, 1/4 cup of shortening, and the sugar-water mixture. Use your hands to gently mix these ingredients together just till it comes together into a crumbly dough and compress so the dough holds together in one piece.
Shape the dough into a disc, wrap in plastic wrap, and rest in the fridge for 1 hour.
Dough 2:
In the bowl of your food processor, add in 1 1/4 cups of all-purpose flour, 1/3 cup of granulated sugar, and 1/2 tsp of salt. Pulse to mix the dry ingredients.
Add in 1/2 cup (1 stick) of cold unsalted butter that's been cut up into 1" cubes and 1/4 cup of shortening. Pulse the food processor till the pieces of butter are the size of small peas, and the mixture looks like coarse meal.
Add in 3 tbsp of ice-cold water, and continue pulsing until the mixture just comes together. Transfer this mixture into a large mixing bowl, and compress the dough just so the dough holds together in one piece. Shape the dough into a disc, wrap in plastic wrap, and rest in the fridge for 1 hour.
Laminating the Dough:
NOTE: if you have a digital thermometer, the butter / dough should ideally be between 55 to 60 degrees Fahrenheit (13 to 16 C) when folding and rolling.
Generously dust a clean surface with flour, and roll out Dough 1 into an approximate rectangle shape that's 10" by 16", making sure the bottom is not sticking to the counter surface.
Take Dough 2, and crumble pieces of Dough 2 over Dough 1 so that it covers most of the rolled-out rectangle of Dough 1.
Put plastic wrap over all of this, and roll out the Dough 2 crumbles to flatten and smoothen them onto the Dough 1 rectangle. Do your best to make a perfect 10" by 16" rectangle with straight edges and 90-degree corners. It's okay if Dough 2 doesn't completely cover Dough 1, and there are patches of uncovered areas even after rolling.
Fold both of the 10" edges towards the center so that they meet in the center. Pat these down so the layers stick together. Try to make everything neat and make the edges line up as much as possible. Use a pastry brush to brush off any excess flour from the top surface (excess flour will prevent the layers from sticking together), then fold the resulting 8" edge towards the other 8" edge.
Pat down the folds a bit to compress the layers together. Transfer it to a parchment paper-lined sheet pan, cover it with plastic wrap, and let it rest in the fridge for 1 to 2 hours, to let it return to the 55 to 60 F (13 to 16 C) range.
When it's within that ideal temperature range, do another set of folds. Rolling out the longer edge to 16" long, roll it out into a 10" by 16" rectangle again using the same technique as before. Use a pastry brush to brush off any excess flour on the top surface. Fold both of the 10" edges towards the center so that they meet in the center. Pat these down so the layers stick together. Brush off any excess flour from the top surface of this fold, then fold the resulting 8" edge towards the other 8" edge.
Gently pat and press the dough a bit to compress the layers together and make sure all the edges are neat and aligned. Transfer the dough back to the parchment paper-lined sheet pan, wrap it tightly in plastic wrap, and leave it in the fridge for another 1 to 2 hours, to let it return to the 55 to 60 F (13 to 16 C) range.
Forming and Baking the Hopia:
Take a 13" x 18" sheet pan and line it with parchment paper.
NOTE: the butter and dough should ideally be between 55 to 60 F (13 to 16 C) during this rolling step.
Take the dough out of the fridge and roll it out into a rectangle that's 10" by 16". Try to keep the edges as straight as possible, and the dough as evenly thick as possible throughout.
Measure and make marks that are 1" apart along the 16" side, and cut the rectangle into a total of 16 strips that are approximately 1' wide and 10" long. Roll each strip to form small cylindrical logs that are 1" tall.
Place the short cylinders of dough on the small parchment paper-lined sheet pan from before, and keep them in the fridge to keep the butter cool and return to the 55 to 60 (13 to 16 C) range. Lightly grease your counter and rolling pin to prevent the dough from sticking to them during this final rolling process. From this point on, clean up any excess flour on your counter surface, as extra stray flour can prevent the dough from coming together. Use oil, rather than flour, to help prevent sticking.
Taking one of the circular pieces of dough at a time, use a thermometer to make sure the butter is between 55 to 60 degrees Fahrenheit (13 to 16 C) before this final rolling step. Place it so that the layers are facing up, and flatten it with your hands bit and shape it into a circle. Then using the rolling pin, flatten the dough further into a circular shape, about 4 inches in diameter.
Add one portion of ube filling (previously divided earlier) in the center of the circle. Use a bench scraper, as needed, to help unstick the dough from the counter. Fold the dough disc together by bringing the opposite sides of the circle together, and then pinching the closed circle together tightly to ensure the hopia is sealed. Shape it with your hands as necessary to create a more even circular shape.
Place the assembled hopia seam-side down onto the prepared parchment paper-lined 13" x 18" sheet pan. Place the formed hopias in the fridge to keep the butter layers cool.
Do the same steps with the remaining 15 pieces of dough, to make 15 more hopias, one piece of dough at a time to make sure the butter stays cool. Lightly grease your counter and rolling pin between each hopia, as needed. Place the formed hopias in the fridge each time, to keep the butter layers cool.
Place an oven rack in the middle position and preheat your oven to 425 F (220 C). In a small bowl, beat 1 egg to make an egg wash.
Right before baking, brush the top surface of each hopia (which should be seam-side down) with egg wash. Then bake them in the preheated oven at 425 F (220 C) for 25 to 28 minutes, or till they're golden brown.
Let them sit on the pan for 5 minutes to cool slightly, then transfer to a wire rack to cool further. Enjoy!
ADVERTISEMENT
SIMILAR RECIPES

Ube Basket

Peach Mango Pie